Thursday, January 28, 2021

Flashing ZTW Spiders for FlyShot

Intro

Thanks for /u/torukmakto4 (in particular this), and /u/bendy1996 for info on these ESCs (hopefully didn't miss anyone!).

These ZTW Spider ESCs can be easily found on ebay and elsewhere, and are a pretty good supply of simonk ESCs for the hobby. But flashing these, especially documentation on flashing these for FlyShot is pretty sparse. This aims to fix that.

What to buy

Look for a ZTW Spider ESC 30A (Normal size, 25x43x9, the small ones do say small on the package, so it's hard to miss!). All the ones I have seen are labeled Opto. Be careful to avoid the ZTW Spider Pros, which won't work for our purposes (not an AVR). Most of the listings on ebay will either say simonk in the description, or have a picture with simonk featuring prominently on the packaging.

Figure 2: Here's an example, see the top of the bag for the simonk label.

There's also listings for a 12A, 20A, 40A, 50A, and 60A, which I will go into for the sake of completeness. The 12A ESC in particular seems interesting for ultra compact builds. 

There's also a 30A small I found nothing on, so from this point on assume when I say 30A, I mean 30A full size, and not the 30A small. Same for the other small variations like 40A small, and any others. They probably work fine, just untested and unknown which .inc file should be used.


I can confirm the 30A/40A works using bs_nfet, and it's likely the 20A will too.

Based on images online and research, the 20A just appears to be the 30A but without paralleled mosfets. Same size footprint, so not much of a reason to get it (see linky).

Warning, the following gets a bit rambly as I basically compile a few hours of web searching and forum browsing. Feel free to skip over to flashing.

The 12A I've ordered (for some fun with a compact 1408 build!), but haven't received yet. Feel free to ping me (/u/matthewbregg) to ask for an update on those in a month or so. I expect bs_nfet to work on them, based on some random posts. I found a nice thread with guts/USBAsp pad locations too, that apparently indicates a V2, but the V2 still uses bs_nfet, but must have it's fuses set over USPasp. I found a random store page with the quote "V1 version means SimonK Program,V2 version means ZTW Program.We offer is with SimonK Program,V1 version", but I wouldn't put much faith in that. Oh, well, I'll see what I wind up getting/if I have any trouble with it. Seems worst case for the 12As is I have to set fuses before flashing with bs_nfet, NBD.

There's also 18As, but be careful of those. There's apparently V1, which uses the BlueSeries 12A/bs_nfet firmware, and a V2 which uses a different firmware. There's a BLHeli inc file available for the V2 at least, so we have an easy way of knowing it's pinout. It should be a possible to either find a matching .inc file in the simonk repo, or just creating a new .inc file using the pinout the BLHeli .inc file gives us. The forum link contains images of the two pcbs, which are noticeably different, so once obtained it should be simple enough to figure out which version you have. Still, without a good way to tell the V1/V2s apart at buy time (maybe a detailed shop image, model numbers?), I'd avoid the 18A versions unless you really needed to save those 2 mm off the width.

(Source)

Flashing

All 4 of the ZTW Spiders I have obtained so far have had a bootloader which enables one wire flashing over an Afro linker. However, kkmulticopter has NOT worked, it gives me a content mismatch when verifying.

A few notes on any flashing with a two wire flash tool (EX: Afro usb linker)

The ESC must be powered, I use two 7.2V NIMH packs in series (overkill). Anything with enough voltage to be above the dropout of the regulator oughta work. You don't need, or arguably want the motor attached. I've flashed both with and without a motor however. If you use a lithium pack, a fuse or protection of some form is advised.

You might need to ensure you are in the dailout group, run your flasher as root, or chown/chmod the device (sudo chown $USER /dev/ttyUSB0).

Linkers

If you already have an Afro USB tool, that'll work fine, but those are unobtainium now.

I've got two suggestions for that

I have not personally tried either however, so cannot fully vouch for them.

I can confirm that both RapidFlash and KKMulticopter have both tools listed in their dropdowns.

Hooking up is a simple as plugging the ESC 3-pin female header into the tool.

Note that many linkers come with a VCC pin, since I'm powering these via a pack anyway, I just snip that. Having two misaligned VCC voltages could do bad things.

What firmware to use

Based on reddit posts/blogs from /u/torukmakto4, bs_nfet seemed like a safe bet for both the 30A and 40A escs. And I can confirm it has worked for the ones I've tried.

If you get a different model, you might want to google around to check, but as my earlier rambling indicate, this can be… tricky.

The hex file I've used has been the precompiled bs_nfet available here. I know this works for the 30/40A Spiders, and I'm fairly certain there's no V2s or other weirdness out there to worry about with those models. This does away with the 10 khz carrier frequency for a ~17khz one, which has proven to be fine so far, I've had no rocky starts.

If you have startup gremlins, then might make sense to download the simonk github, replace the tgy.asm, bs_nfet.inc files with the ones from the above google drive. 

 Find

.equ	POWER_RANGE	= 800 * CPU_MHZ / 16 + MIN_DUTY ; torukmakto4

and change it to

.equ    POWER_RANGE     = 1500 * CPU_MHZ / 16 + MIN_DUTY ; torukmakto4

and run make to get your bs_nfet.hex. You will need avra and make installed.

On ubuntu, you can run

sudo apt-get install avra make 

The downside to switching between 10khz/~17khz is the 10khz carrier frequency is audible (for humans, dogs reading this may as well stick with 10khz regardless).

KKMulticopter/raw avrdude attempt and failure

I am suspicious of this bug, as the version of avrdude included is 6.0.1, however attempting to use a newer version of avrdude, even with the conf file from kkmulticopter results in

Reading |                                                    | 0% 0.00savrdude: stk500v2_command(): command failed
avrdude: stk500isp_read_byte(): timeout/error communicating with programmer
avr_read(): error reading address 0x0000
    read operation not supported for memory "signature"
avrdude: error reading signature data for part "ATmega8", rc=-2
avrdude: error reading signature data, rc=-1

Only difference I can find between what the output header reports is

SCK period      : 45.6 us
vs 
SCK period      : .1 us (new version)

Using the version of avrdude included in kkmulticopter gets farther, with a seemingly successful read and then write before giving a content mismatch error again. If you've got an idea what's wrong here, I'd love to know, using avrdude for this directly would be great!

The command kkmulticopter runs is

/path/to/kkmulticopterflashtool_0.77/lib/avrdude/linux64/avrdude \
-C /path/to/kkmulticopterflashtool_0.77/lib/avrdude/linux64/avrdude.conf \
-p m8 -P /dev/ttyUSB0 -c afrousb -b 9600 -e -U flash:w:/path/to/spider_flyshot.hex:i

New Approach: RapidFlash

The bootloader appears to be there and working, but buggy with kkmulticopter, and attempts at raw avrdude have failed. I happened upon a different tool, RapidFlash, which did work.

Usage is pretty simple:

  • Set the serial port to the correct one (on Linux, should be something like /dev/ttyUSBN, on windows, probably COMN). You should be able to remove/plug in your programmer and watch this change.
  • Set the tool to the afro esc usb linker (or whatever linker you are using).
  • Load the hex file via the Load Local Firmware Button.
  • Click Flash Firmware.

Figure 3: RapidFlash UI

But of course, having this tool exist and be healthy would be too easy. RapidFlash is a chrome app, which is going away in the middle of this year. And it hasn't had any activity on it's github (shoulda dropped that link earlier) page for 5 years…. So while you can grab it here for now and have it easily install in chrome or chromium, that's limited.

Oddly enough, once RapidFlash has programmed it once, the ZTW spider ESC is then good to go and can be programmed with kkmulticopter. I did check the fuses and saw no difference before and after.

Workaround: Use portable chromium installs that won't update and hopefully won't break

Warning: Do not browse the internet in these ancient browser images.

I have tested both the windows portable install and the linux appimage, both give an older version of chromium that I expect won't break. I also cloned the repo in case that goes poof.

Final Approach: UsbASP programming

In the event that RapidFlash isn't working, or you won the unlottery and got an ESC with no bootloader, you can fall back to usbasp programming.

You'll need a USBasp programmer, they're pretty cheap thankfully, <10 dollars with shipping. Personally I've had success with the "HiLetgo 51" USBasp programmer on linux.

You can view the Atmega8 pinout here. Note the MOSI, MISO, RESET, SCK, and VCC/GND pins.

You can use a multimeter while the ESC is off to follow them to the pads (see image below).
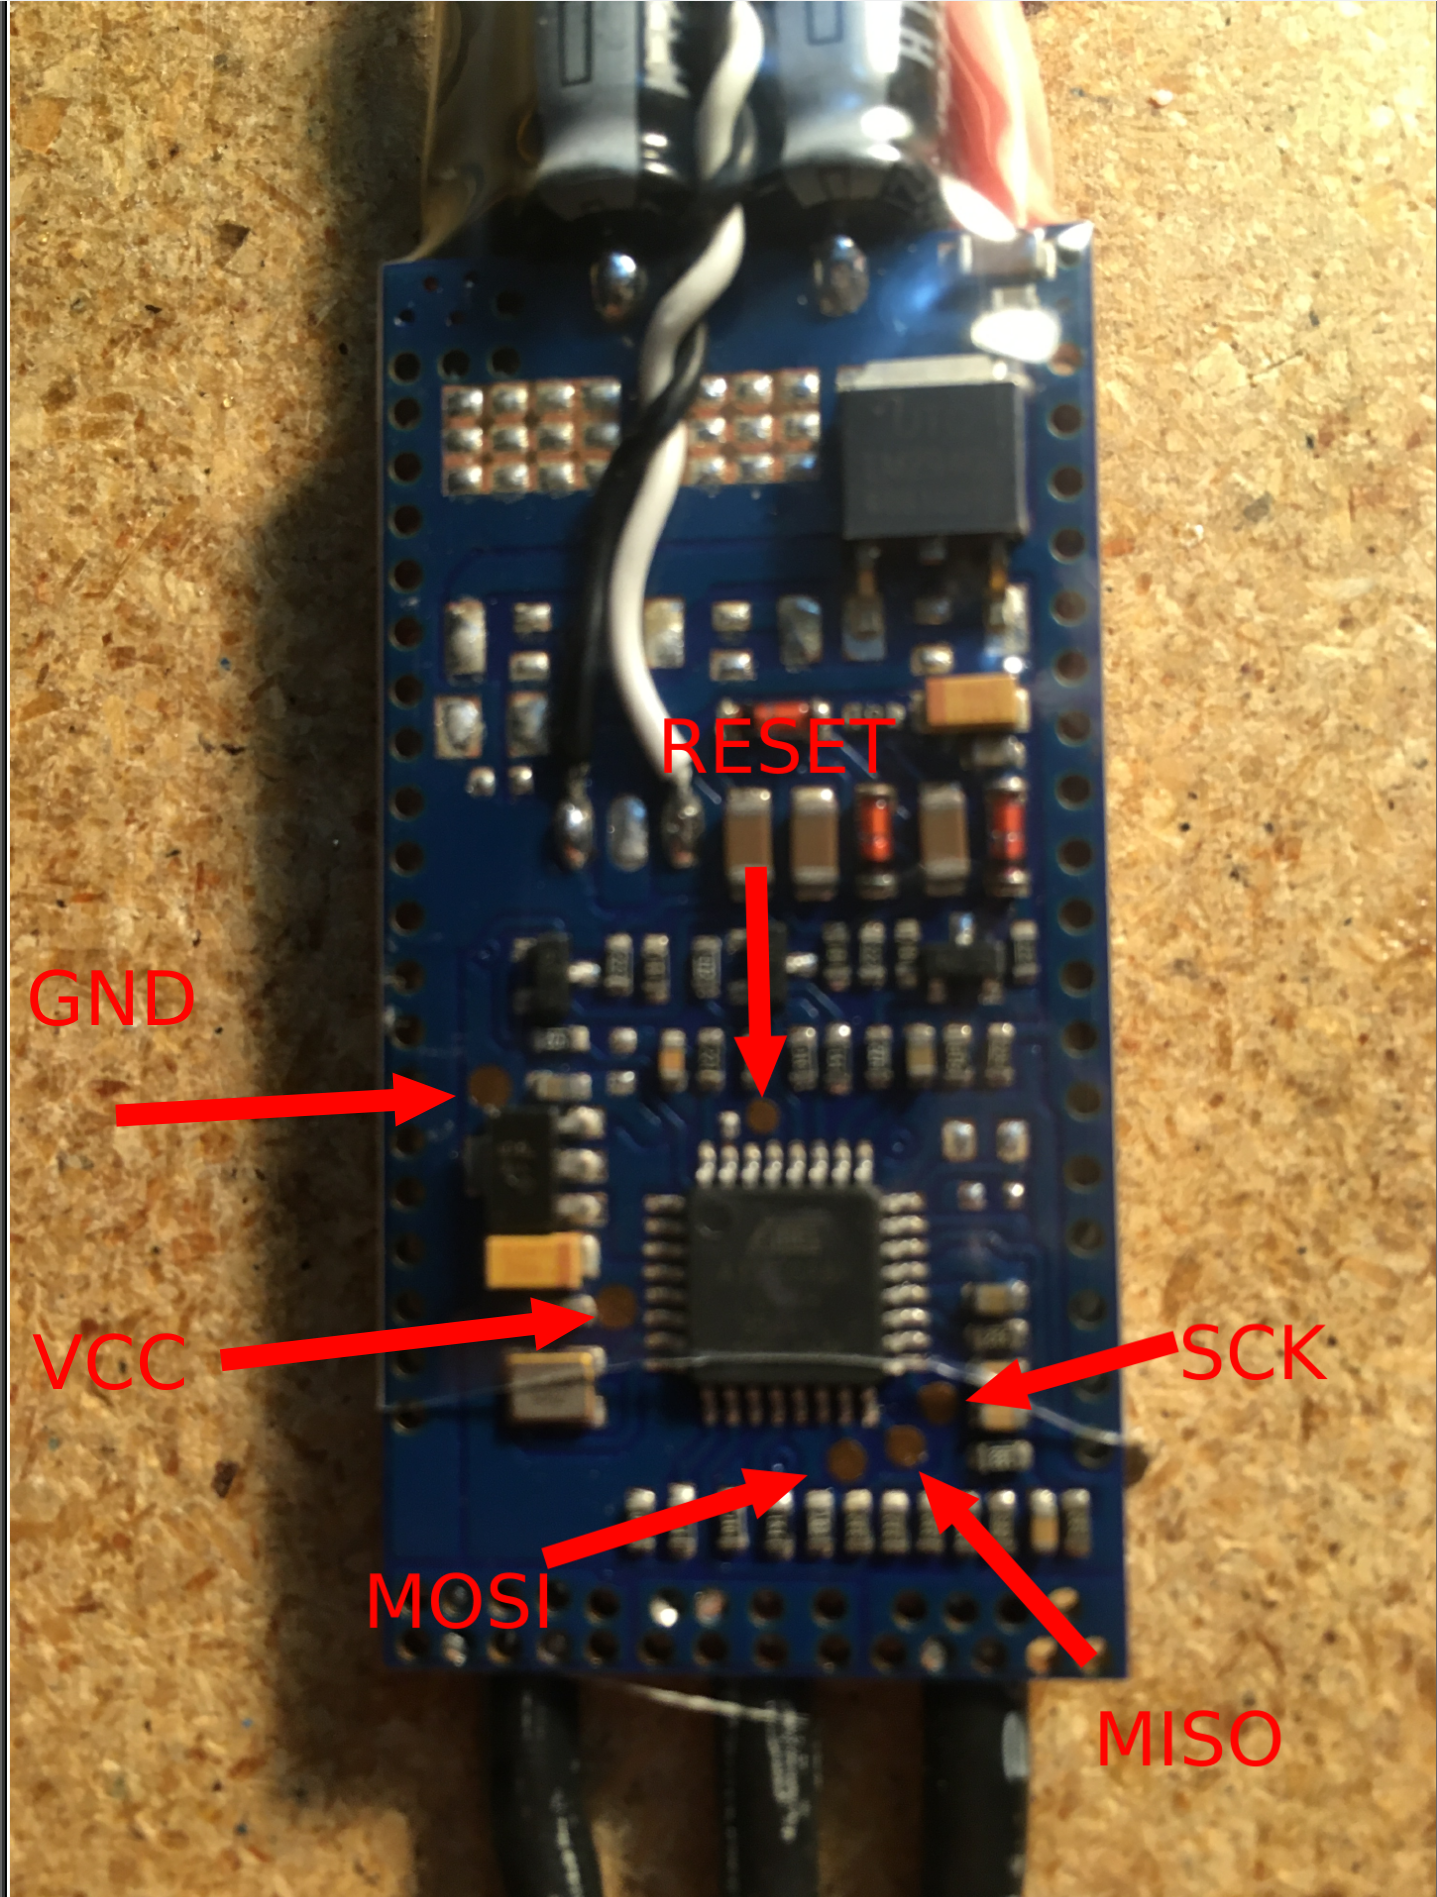
Figure 4: What the pads on the Spider ESCs look like, and the SPIDER 40A ESC mapped.

Figure 5: Note that the 30A ESC looks to be verrryy similar, I'd double check, especially the VCC/GND pads, but I imagine it's the same. I can confirm MOSI is the same at least, and I'm holding a probe to it.

Fuses should be already set, (you can use avrdude to change them/make sure anyway), so you should be able to hook this directly up to a USBAsp programmer and use kkmulticopter to flash (selecting usbasp from the dropdown).

Wiring for Flyshot and Using

Congrats, you've flashed your ESC! Now you can use Flyshot to set your speed! If however, you want speed feedback, you'll need to make one last modification.

(And if you solely want to set the speed, and don't want a tach signal, you should probably consider this version with a form of error checking, although it's not as up to date. )

You need to get the MOSI pin out and available to your blaster control board.

Thankfully, that's easy.

Figure 6: 40A Pinout again, note the MOSI.

Figure 7: 30A Pinout again, the probe is over the MOSI pad.

Figure 8: Get access to the bottom pad.

Figure 9: Carefully tin said bottom pad.

Figure 10: Carefully strip some thin wire (I used 24 AWG), tin it, and then solder that to the pad.

Now add some kind of strain relief! You don't want to rip the pad off! You'll also want to cover up the exposed PCB somehow. I ran the wire along the body of the ESC and wrapped a bit of electrical tape along the bottom to serve as both strain relief and insulation.

I braided the tach wire into the existing signal wire braid, but any form of wire management works.

Figure 11: Cut the old ESC connector, get a new 3 pin female header, and solder the gnd, signal, and tach onto it. I prefer to keep tach in the middle.

If you want to use a different ZTW Spider ESC than a 30A/40A, you'll want to double check the MOSI pin. See the USBAsp section above for directions on how to do that. 


You know, I feel like I missed out on a chance to run my Spiderman themed blaster on Spider ESCs. Oh well....


Update


My newest spiderman themed blaster is now running spider ESCs.


All is right with the world.


Spider 12A ESCs


These work just fine with flyshot, bs_nfet as expected.

Multimeter probe is over MOSI, otherwise treat the same as the 30A/40A spiders.

These would probably be pretty good for powering a small FTW style blaster, with tiny 1408 brushless motors.

Thursday, December 17, 2020

T19 - New full length breech; iFlight Xing-E 2207 and 2306 motor support; experimental 9.0mm gap wheels and cages.

The files named by the headings in this post are, as of the publication of this post, added to...
 
 
...in FreeCAD .fcstd source, STEP solid model, and STL mesh format in the appropriate directories with the appropriate extensions.
 

T19_FullLengthBreech_Gen2


A redesigned full length breech. Accepts most if not all superstock standard full length (12.7x72mm) magazines.


Uses the same T19_FullLengthMagRelease and T19_ControllerCovers as the original style breeches did. Uses the same hardware:

  • 4 * 6-32 x 1" SHCS (Controller covers, top)
  • 2 * 6-32 x 5/8" SHCS (Controller covers, bottom)
  • 4 * 6-32 x 5/8" or 3/4" SHCS (Cage module to front flange)
  • 2 * 6-32 x 3/4" SHCS (Rear flange to drive cover)
  • 2 * 6-32 x 5/8" SHCS (Rear flange to drive housing, center 2 holes)
  • 2 * 6-32 x 1/2" SHCS (Rear flange to drive housing, lower 2 bolts)
  • 1 * 6-32 x 2" SHCS (Mag release pivot; shortened)
  • 3 * 6-32 x 1/2" SHCS (Top rails to breech)


The old stock-blaster-style overinsertion stop methodology using the external ridge on mag bodies is eliminated and the overinsertion stop function is provided using the top of the feed lips as with the short dart breech. Accordingly, the magwell can now be angle-cut for aesthetics and ease of loading, and flared for ease of loading, as is the case with the short breech. Original full length magwell dimensions are retained. The fit is intentionally loose on many mags as it was before, for drop-free handling with most mags, and compatibility reasons, due to the large tolerances of this mag format.

The geometry at the front of the feed path has been improved.

The mag is now slightly further from the cage. The thin front wall is no longer so thin behind the cage flange. This allows a compound pre-ramp.

The thicker wall with ramp also prints cleaner and reduces the risk of burrs in this critical area.

The front halfpipe's edges have received a larger radius than the previous design and the oncoming lower edges meeting up with the mag body are now at an oblique angle to reduce the presentation of any sharp or tangential oncoming edge/surface at the advancing rounds.


Similarly, the rear of the feed path has received particular attention.

During the feeding process, the last event that must occur within a fraction of one cycle time as the bolt fully opens and clears the mag is that the rear of the topmost round (which was just being held down by the bolt) must rise up and seat in front of the boltface, ready to be pushed forward. If it bounces or snags slightly on anything, the bolt could contact it in the wrong position or miss and pass over it entirely.

As such similar to the front halfpipe, this now presents an oblique ramp but due to the even greater importance of this area (whereas the front of the dart has a much greater time to seat), it is compound.

Note that the sharp edge of the halfpipe end is so because it is a trailing edge.

Trivia: The caliber name 12.7x72mm Hassenfeld is a nod/acknowledgement to the Hassenfeld Brothers, founders of a like-named company, which would eventually go on to pioneer this caliber in 2005.


T19_TopRail_NewFullLengthRearSeg


The top rail rear segment for use with the Gen2 12.7x72mm breech, which is slightly longer than the old. Not much to see here.


Hy-Con-Delta_Main_iFlightXE_9.0_ready;

Hy-Con-Delta_Main_iFlightXE_9.5_only;

Hy-Con-GammaMajor_Main_iFlightXE_9.0_ready;

Hy-Con-GammaMajor_Main_iFlightXE_9.5_only


Hy-Con cage mains for iFlight Xing-E 2207 and 2306 motors. The same cage main supports both 2207 and 2306 variants. Only the flywheels differ between the two.

These motors have open stator bases and 16x16mm mounting patterns. They have no shaft end protrusion beyond the mounting plane and require no clearance pocket under the bearing, which is deeply recessed.

Fasteners for motor mounting are M3 x 10mm button head; shared with Turnigy cages.


The 9.5_only variants have the traditional Hy-Con groove filler geometry. They suit the traditional 9.5mm gap flywheels.

The 9.0_ready variants have slightly shaved groove fillers in order to restore safe clearance to the wheel profile with the 9.0mm wheels in the next section:


This modification by all means should be appropriate to use with any wheels, including 9.5mm and any larger special-application wheel - due to the radius on the filler edges in the original 9.5-minimum cages - geometry which is still the same and in the same place, only truncated a bit - this trim has very little impact on what is actually presented to the dart edgewise. I include the classical untrimmed version only as a matter of course and backup measure should any gremlins be discovered by anyone.

Also, there is no corresponding set of covers (or shaft end plugs) for these mains - they use the existing Racerstar BR2207S covers and plugs. This will very likely be the case in the future as well; most motors will be suited by either the Emax or the Racerstar cover/plug set. The Racerstar cover parts are universal to all presently supported motors and technically everything else could be deprecated.

The final little gotcha is an iFlight thing - iFlight has two main lines of motors, one of which is our relevant Xing-E. There are also a (just) Xing 2207 and Xing 2306 (without the -E). Those will NOT work. Those, in fact, are completely useless to me, because they use a novel "unibell" construction for the rotor and for aesthetic reason the outside of the rotor is not cylindrical thus I can't mount an OD-centric wheel on them. What we need here is the Xing-E, which is iFlight's slightly cost-reduced version with traditional rotor construction.


Hy-Con_iFlight_XingE_2207_9.0;

Hy-Con_iFlight_XingE_2207_9.5;

Hy-Con_iFlight_XingE_2306_9.0;

Hy-Con_iFlight_XingE_2306_9.5


Flywheels for these motors and cage parts. Print normally for Hy-Con flywheels i.e. 0.1mm layer height with optional 0.2 first layer height, 3 perimeters at 0.45mm or similar EW, rectilinear solid fill, 20% haxagonal infill, 8 bottoms 8 tops, random start/seam position. Nice and slow and clean, and get good fusion, and as always, whatever you do, don't underextrude. N.b.: Rotor OD fit may need tweaking for high thermal expansion non-PET materials such as ABS as always.


The 9.0mm gap option is the big exciting new thing aside from the 2 new extra-grunty motors - this is still semi-experimental, but is worth a bit more zip. I have, with the appropriate speed settings (remember to check maxRPM in any existing S-Core build as more than 25.5k will be required to reach critical with these on new ammo), seen 5-10fps more with used ammo and shot around 200fps with new ammo. Use only in concert with the 9.0_ready cage mains to ensure safe clearances! I have not seen many ill effects on accuracy nor dart decapitation rate, after a proper break-in period has been completed, and transfer layer has been established and stabilized.


The 2207 is a fairly long motor. Its corresponding wheel has 1.0mm of extra web offset and is 15mm thick, similar to the Racerstar BR2207S wheel.


In the future, this same or a similar wheel may be used to support the 2208 version of this motor in combination with a specific cage main with a circa 1mm greater mount offset; or else the 2208 may get its own +~2mm web offset wheel and possibly a slightly clearanced application specific cage cover.

The 2306's wheel is a standard, 14mm thickness design, albeit with a similar web thickness to the 2207 and Racerstar wheels - the 2306 is still on the long side versus the Turnigy V-Spec and especially the Emax RS2205S motors.


Aligning the rotor keys on these is a bit of a pain in the ass, unfortunately. Also, the rotor OD press fits are intentionally tight and the 2306 version especially is gorilla tight, so scrape/sand/deblip/destring the bore beforehand and be prepared, it's not SUPPOSED to slide on easily, it is supposed to be an interference fit. Do not thrust load the bearings, do not dare TOUCH that stator base when forcing the wheel on! It is often apt to use the shaft nut to help cinch it up the last few mm, but if it doesn't want to seat, do NOT keep cranking on it - check the key orientation and try again.

Below image shows how much the edge of the rotor backiron should be protruding on a fully seated wheel, by the way. Not much - about a mm, maybe a little less.


Effort and care building a Hy-Con system will be rewarded with a long-term reliable rotating assembly you will never need to mess with ever again for as long as the motor and its bearings keep on chooching, something which those other blasters don't fully achieve.

The motors are each available in 3 winds - the one appropriate for typical 4S (or 5S, or 12-16 cell NiMH, 5/6S LiFePO4, etc.) setups is the 2450kv. The 2750 would be ideal for (yes, I hear you; upcoming) multistage cages on 4S, and the lowest kv wind for high bus voltage (6S) single stage builds. As always, although kv and battery voltage have nothing to do with speed in closed-loop situations and you CAN use any combo capable of reaching the full range of speed setpoints you are using without running out of voltage command, using a needlessly high kv motor results in a less efficient system operating point and will only get you less torque, worse spinups, less battery life and hotter motors and inverters. More kv is not better.


Hy-Con_iFlightXE_ShaftWasher


Pretty self-explanatory - as with other threaded shaft motors optioned on the Hy-Con system, these motor/wheel combos have their own correct-thickness shaft washer to both take up unthreaded extra shaft length and to spread the clamping load.


Print any ways you like as long as it's got random starts and ends up 100% solid.

Be sure to check out the previous post back, on the build that validated all this stuff...

As usual, it was a super satisfying one to put together, and it feeds like clockwork and shoots lasers. Full length life!

Sunday, November 29, 2020

Adventure Force Sportsman internals, measurements, predictions

The Sportman has caught my attention. As I've said before, it's nifty - it does something that conventional wisdom has held to be impossible, and what's more does it well - and I'm looking for ways that it could be put to good use. 

So, today I'm doing a detailed teardown of the blaster. I'm doing this to get a good look at what's in there and what it can do, but this post should also serve well as an internals reference.

Extensive Adventure Force Sportsman reliability testing

This has previously been posted on reddit, here. I'm resposting on this blog primarily for the sake of having an archive with all of my work with this blaster in one easily-searchable place.

The Adventure Force Sportsman does something that conventional wisdom has held for years to be impossible: it feeds darts into a chamber through a hopper. Naturally, this raises concerns about whether this blaster can do so reliably. As a hopper-fed blaster, the Sportsman should be great for scavenging and for lightweight loadouts that avoid the use of magazines - if it is sufficiently reliable. That's a big "if," and that's what I set out to test here.

This is going to be a long, drawn-out post on a single blaster. There's a summary of the results near the start, after the jump.

Saturday, November 14, 2020

Thoughts on MLCC as inverter DC link capacitor

In quadcopter/drone ESCs post-BLHeli, it has bcome common to use arrays of multilayer ceramic capacitors (MLCC) as the DC link capacitance. A MLCC farm like this has become a familiar sight.


There is some considerable merit behind this. MLCCs have extremely low ESR and ESL, comparable to plastic film caps and any other type of non-electrolytic capacitor, and could do the job with much less capacitance than an electrolytic, which actually really suck at being DC link caps, despite always being used historically for DC link caps. More reading on the subject. Beyond that, an array of MLCCs on a board packages flat and thin and avoids dangly bits, and in terms of overall package length, the length of an existing lytic can added to the PCB is enough area to fit plenty of MLCCs.

On the cost front, it isn't too bad. A 10uF 50V X7R 1206 part, likely similar to the 18 parts on the above nerfish-scale board, from the vendor I usually use for MLCCs (Samsung Electro-Mechanics) can be had for 10 to 15 cents at this point in moderate quantity. If the Salcone-Bond whitepaper example cases are taken to frame a rule of thumb, certainly 18 to 20 such parts totalling 180 to 200 uF should suffice in most cases to replace the lytic(s) outright, at least in the current handling and bus ripple sense.

There are a couple of reasons I have been very reluctant about adopting either this strategy or a hybrid one with a smaller lytic and a handful of MLCC though, instead favoring the tried and true, dirty great big electrolytic, solution.

One is that MLCCs are brittle and sensitive to stress, whether mechanically induced (external forces or flexing applied to boards) or due to thermal expansion. And when these things crack, they often become shorted. High-current, deeply parallel MLCC farms directly across a lipo and immediately next to a heat source (FETs) give me pause for this reason - there are a lot of parts there to multiply the failure probability, they are attached to beefy, heavy (inflexible) copper planes, they get heated a whole lot at installation to solder them down to said planes, and they and the differentially expanding PCB are being constantly thermal cycled by FET heat in operation. If one dies, it likely causes a rather high-energy smokey unconfined failure, destroying the PCB and possibly resulting in combustion. I worry enough about the single big MLCCs that are across the battery on my ESCs and S-Core boards already. Is it really worth such fear? It is paranoia? I don't know, drones don't seem to be nuking ESCs all that frequently, I guess. Meh.

Another is that a pure MLCC solution has no "damping" the way lytics do. Small motor controllers normally don't have precharge setups for the caps at startup, and just get switched up with a huge inrush into the caps (and the familiar spark). Between the source inductance and the several hundred uF of basically-zero ESR caps, there could be spiking when powering up with just ceramic caps. It's like setting a car suspension spring vertically on the ground and hitting it with a sledgehammer. Pololu warns about this with their DRV8825 carrier boards, and their answer is to always have a lytic nearby on the same bus (as the 4.7uF 1206 input cap on the board). Advice to do similar things is common. So perhaps it is apt to use a hybrid solution at most, not purely MLCCs. Or perhaps a TVS on the bus could guard the FETs and logic power supply against overvoltage spikes sufficiently.

The third is that a MLCC farm to replace lytics turns 1 or 2 parts into 15-20 or more for a larger board, and a hybrid solution adds 4-6 parts and still doesn't completely remove the lytic cans that have to stick out somewhere, only make them smaller.

The fourth is that often, a huge surplus of capacitance is beneficial. The Salcone-Bond view of DC link caps assumes that they are solely there to source ripple current and stabilize the bus voltage at the input. In the real world, big lytics are often doing something else. In VFDs and appliance motor drives, they are much more a bulk energy store, since the input is rectified 50/60Hz mains and there are big valleys in the voltage that need filling in. In blasters, that's irrelevant, but they sometimes are doing the same thing to cache some local charge and prevent marginal battery and wiring conditions from causing the floor to fall out of the bus voltage as easily during a motor current transient (possibly to the extent of causing MCU resets and other woes). It's all the more important when batteries are NOT lipos (lipos are much more non-inductive than usual due to the stacked construction) and/or there is a long cable between the battery and the inverter, which appears multiple places in blaster design. Blasters can have much less optimal battery situations than RC stuff - just the matter that people play HvZ where/when there is snow on the ground and they are NOT going to be keeping a pack warm, for instance.

On the flip side, I do suspect my layouts with just the lytic at the end of the board are suboptimally decoupled and could benefit from a few MLCCs very, very near the actual devices in addition. And I kinda want to do a lytic-less board sometimes just for variety and to have an option that can be as thin as possible.


Edit/footnotes: https://www.rcgroups.com/forums/showpost.php?p=38006136&postcount=1220 https://www.reddit.com/r/Multicopter/comments/7nb2zs https://www.rcgroups.com/forums/showpost.php?p=41652761&postcount=16 https://www.rcgroups.com/forums/showpost.php?p=41660297&postcount=17 More interesting accounts of electrolytics and MLCCs and I wasn't surprised to see the exploded rail of MLCCs with a 1000uF lytic bodged in its place!

ACE-NX inline final tweaks, test boards on the way.

Last revisions: Fixed some potential shortcomings with grounding. Added a little copper island on the other side behind the phase wire pads on the edge. Stitched to the pad with 3 vias.


The idea here is to make the phase wire pad more rugged against lifting, this is common to use vias for this purpose in drone ESC boards. It also adds a small extra thermal area and mass to the lowside device.


I decided to mothball the LC Mini for now and focus on getting this beastie spooled up first. It will also be my potential dev board for the 6EDL04/ace.hex target before doing the mountable version.

Wednesday, November 11, 2020

ACE ESC: ACE-NX (inline wiring version) 1.0

Progress on the ACE-NX project has involved mostly ditching the bs_nfet_noninverting pinout and rethinking all the MCU pin assignments.
  • Gate, enable and nFault signals for the driver are all moved together and in order with the 6EDL04 driver pinout.
  • Throttle input uses ICP like Afro, not INT0 like bs_nfet. This kills some jitter and half the interrupt overhead associated with INT0. Also makes the throttle routing much better.
  • Phase voltage sense lines moved together.

However:


I also designed another board that was not what I was and am eventually intending (the mountable one), rather it's another ESC style unit. It's a combination of there probably being market demand for inline-wired boards like this, and me needing them for the T19 which I am not going to simply be replacing entirely anytime soon, and the fact that regardless of anything, since I DO want to start selling ESCs, I am either going to sell a modern driver-equipped board OR I am going to sell LC2s. So, it was time for the discrete drive to go and the LC2's beef shortages to be beefed, with the future of bigger motors and higher voltage DC busses in mind.


Which they have. The NX Inline is 1mm wider than the LC2 (26mm, same as Afro FS20), has beefier source connections on the lowside than the LC2, is busbar ready (use solid wire) and has significantly more highside device copper area/heatsinking even before adding a busbar.

Other improvements on the LC2 include revised FET footprints, all ISP pads in one place, plus the usual SimonK ready and warning LEDs, because blinkenlights. Also, the sense network may have finally received some due consideration. I tried to shove it to the opposite side of the board from all the noise sources like the DC bus path to the caps, and the SMPS. Something about sense networks is that the phase node, since it is directly connected to the motor, is mega low impedance, that's likely not what is going to receive noise. It's the node after the first resistor in the divider and of course the neutral. Those in my past boards had some long convoluted traces mixed in with the rest of the MCU-related traces and that is not good. With this one the resistors are right next to the associated MCU pin, the other ground resistor is directly underneath on the other side, neutral routing is very direct and the trace lengths are minimal. Will be seen whether these are cleaner starter-uppers than LC2s, it may just turn out to not matter.

Gate drive supply is from an AP3012. This uses a linear logic supply due to area and the lack of more good places away from sensitive stuff like the MCU oscillator and sense network to put a switching noise source without this board either getting bigger or being a pain in the ass. It is minimum 0805, as this is going to be the new general-purpose "not mini" ESC board and it is important that it not be a pain in the ass for either me or other people to make. Bootstrap caps, LDO input cap, boost input and output caps and driver 12V decoupling cap are all 1206. Also, it uses 40x20mil vias (mainly, for power stage reasons) which should eliminate fab issues as well with drill size.

Voltage rating depends on LDO and FETs. This can take a few different 40V devices and there are several 42 and 45V SOT-223 LDOs (the one I normally use is 40V) to correspond.

A bit of an erratum is that I post-schematic'd 3 0805 resistor footprints into this for pulldowns to ground on the lowside gates. Granted, every single FET/IGBT driver datasheet, board design and application note I have ever seen says nothing of the need for them, but to me, it just stands to reason that since the driver datasheets often don't give any indication that the output stage is NOT high-impedance with NO power to the chip, OR that there are any internal pulldowns on those gates, something bad could potentially happen at startup where the DC bus comes up a tad before the power rails to the chip do. So, I figure putting 100K or so (so as not to load the driver with much extra current) on the low sides to source will be a good safety measure against the chance that somehow, some gates are charged up when power is applied and cause a brief shoot-through. Probably just total design overkill.

Monday, November 2, 2020

S-Core firmware 0.97: Add nonvolatile user flywheel speed profiles

In the past I envisioned most blasters being run by default at full permitted velocity. If the game mandated less than the flywheel system's critical velocity for safety, that would normally be set with the tournament lock. Of course it would - if you can change it on the field, how could it ever be legal? However, by numbers, most games are quite casual and their playerbases quite mature, and they do not impose the use of the tournament lock, hence the typical usage pattern of adjustable-speed T19 in the wild is that players leave their tournament locks maxxed out and dial their blaster up on the chrono in user speed mode before playing.


This usage of the user speed adjustment mode with no means to save the resulting setting presents a number of problems. One, you have to dial the thing on the chrono every time. Two, if you shut down your blaster for any reason, you just lost your velocity setting. Three, you can't switch between canned velocity settings.

https://drive.google.com/file/d/1czPJ6wRAeR365x6zpS-CtlbzdjfZ84LU/view?usp=sharing

So I made a quick tweak that uses the selector position at boot time to choose a user-defined speed setting in EEPROM to either load (normal boot) or save to (speed config mode). As such, you can dial each in once and next time you want to use that setting, just put the selector in the requisite position before powering up.


Attempting to load a speed setting that is invalid or above the current tournament lock setting will throw a non-terminal Code 53, then save the current tournament lock setting to that profile, and begin normal operation. This will happen if you try to use a setting that has never been saved to (such as just after flashing), or if you try to use an old setting that is now higher than the tournament lock after lowering the tournament lock setting.

Saturday, October 31, 2020

Build: "ZombieStrike" T19E1 Shorty

This blaster is being donated to a local nerfer who lost a bunch of gear in a fire. He wanted a Gamma shorty and a variant of ZombieStrike scheme.


It has the usual control gear: S-Core 1.5 and a pair of ACE LC2.

It is fitted with Turnigy V-Spec motors, and I'm fixing to swap one of them out before it departs because of course one has some extra drag torque. These days with closed-loop feed control it's not like that even matters any more. But, gotta get rid of those dissonant spindown sounds. Turnigies sound so damn good among all flywheel motors when they are right.

 
Filament colors: Yoyi green, Makeshaper cool grey (may be obsolete) Makeshaper orange. The Yoyi green is absolutely as neon and great as it looks through a camera. Much like ZombieStrike green.