Intro
Thanks for /u/torukmakto4 (in particular this), and /u/bendy1996 for info on these ESCs (hopefully didn't miss anyone!).
These ZTW Spider ESCs can be easily found on ebay and elsewhere, and are a pretty good supply of simonk ESCs for the hobby. But flashing these, especially documentation on flashing these for FlyShot is pretty sparse. This aims to fix that.

What to buy
Look for a ZTW Spider ESC 30A (Normal size, 25x43x9, the small ones do say small on the package, so it's hard to miss!). All the ones I have seen are labeled Opto. Be careful to avoid the ZTW Spider Pros, which won't work for our purposes (not an AVR). Most of the listings on ebay will either say simonk in the description, or have a picture with simonk featuring prominently on the packaging.

Figure 2: Here's an example, see the top of the bag for the simonk label.
There's also listings for a 12A, 20A, 40A, 50A, and 60A, which I will go into for the sake of completeness. The 12A ESC in particular seems interesting for ultra compact builds.
There's also a 30A small I found nothing on, so from this point on assume when I say 30A, I mean 30A full size, and not the 30A small. Same for the other small variations like 40A small, and any others. They probably work fine, just untested and unknown which .inc file should be used.

I can confirm the 30A/40A works using bs_nfet, and it's likely the 20A will too.
Based on images online and research, the 20A just appears to be the 30A
but
without paralleled mosfets. Same size footprint, so not much of a reason to get it (see
linky).

Warning, the following gets a bit rambly as I basically compile a few hours of web searching and forum browsing. Feel free to skip over to flashing.
The 12A I've ordered (for some fun with a compact 1408 build!), but haven't received yet. Feel free to ping me (/u/matthewbregg) to ask for an update on those in a month or so. I expect bs_nfet to work on them, based on some random posts. I found a nice thread with guts/USBAsp pad locations too, that apparently indicates a V2, but the V2 still uses bs_nfet, but must have it's fuses set over USPasp. I found a random store page with the quote "V1 version means SimonK Program,V2 version means ZTW Program.We offer is with SimonK Program,V1 version", but I wouldn't put much faith in that. Oh, well, I'll see what I wind up getting/if I have any trouble with it. Seems worst case for the 12As is I have to set fuses before flashing with bs_nfet, NBD.
There's also 18As, but be careful of those. There's apparently V1, which uses the BlueSeries 12A/bs_nfet firmware, and a V2 which uses a different firmware. There's a BLHeli inc file available for the V2 at least, so we have an easy way of knowing it's pinout. It should be a possible to either find a matching .inc file in the simonk repo, or just creating a new .inc file using the pinout the BLHeli .inc file gives us. The forum link contains images of the two pcbs, which are noticeably different, so once obtained it should be simple enough to figure out which version you have. Still, without a good way to tell the V1/V2s apart at buy time (maybe a detailed shop image, model numbers?), I'd avoid the 18A versions unless you really needed to save those 2 mm off the width.
 (Source)
Flashing
All 4 of the ZTW Spiders I have obtained so far have had a bootloader which enables one wire flashing over an Afro linker. However, kkmulticopter has NOT worked, it gives me a content mismatch when verifying.
A few notes on any flashing with a two wire flash tool (EX: Afro usb linker)
The ESC must be powered, I use two 7.2V NIMH packs in series (overkill). Anything with enough voltage to be above the dropout of the regulator oughta work. You don't need, or arguably want the motor attached. I've flashed both with and without a motor however. If you use a lithium pack, a fuse or protection of some form is advised.
You might need to ensure you are in the dailout group, run your flasher as root, or chown/chmod the device (sudo chown $USER /dev/ttyUSB0).
Linkers
If you already have an Afro USB tool, that'll work fine, but those are unobtainium now.
I've got two suggestions for that
- TGY USB linker. Same STK500V2 chip, and reports of it succeeding with afro ESCs at least. They are also reasonably available from multiple retailers.
- Using an Arduino as a programmer.
I have not personally tried either however, so cannot fully vouch for them.
I can confirm that both RapidFlash and KKMulticopter have both tools listed in their dropdowns.
Hooking up is a simple as plugging the ESC 3-pin female header into
the tool.

Note that many linkers come with a VCC pin, since I'm powering these
via a pack anyway, I just snip that. Having two misaligned VCC
voltages could do bad things.

What firmware to use
Based on reddit posts/blogs from /u/torukmakto4, bs_nfet seemed like a safe bet for both the 30A and 40A escs. And I can confirm it has worked for the ones I've tried.
If you get a different model, you might want to google around to check, but as my earlier rambling indicate, this can be… tricky.
The hex file I've used has been the precompiled bs_nfet available here. I know this works for the 30/40A Spiders, and I'm fairly certain there's no V2s or other weirdness out there to worry about with those models. This does away with the 10 khz carrier frequency for a ~17khz one, which has proven to be fine so far, I've had no rocky starts.
If you have startup gremlins, then might make sense to download the simonk github, replace the tgy.asm, bs_nfet.inc files with the ones from the above google drive.
Find
.equ POWER_RANGE = 800 * CPU_MHZ / 16 + MIN_DUTY ; torukmakto4
and change it to
.equ POWER_RANGE = 1500 * CPU_MHZ / 16 + MIN_DUTY ; torukmakto4
and run make to get your bs_nfet.hex. You will need avra and make installed.
On ubuntu, you can run
sudo apt-get install avra make
The downside to switching between 10khz/~17khz is the 10khz carrier frequency is audible (for humans, dogs reading this may as well stick with 10khz regardless).
KKMulticopter/raw avrdude
attempt and failure
I am suspicious of this bug, as the version of avrdude included is 6.0.1, however attempting to use a newer version of avrdude, even with the conf file from kkmulticopter results in
Reading |                                                    | 0% 0.00savrdude: stk500v2_command(): command failed
avrdude: stk500isp_read_byte(): timeout/error communicating with programmer
avr_read(): error reading address 0x0000
    read operation not supported for memory "signature"
avrdude: error reading signature data for part "ATmega8", rc=-2
avrdude: error reading signature data, rc=-1
Only difference I can find between what the output header reports is
SCK period      : 45.6 us
vs
SCK period      : .1 us (new version)
Using the version of avrdude included in kkmulticopter gets farther, with a seemingly successful read and then write before giving a content mismatch error again. If you've got an idea what's wrong here, I'd love to know, using avrdude for this directly would be great!
The command kkmulticopter runs is
/path/to/kkmulticopterflashtool_0.77/lib/avrdude/linux64/avrdude \
-C /path/to/kkmulticopterflashtool_0.77/lib/avrdude/linux64/avrdude.conf \
-p m8 -P /dev/ttyUSB0 -c afrousb -b 9600 -e -U flash:w:/path/to/spider_flyshot.hex:i
New Approach: RapidFlash
The bootloader appears to be there and working, but buggy with kkmulticopter, and attempts at raw avrdude have failed. I happened upon a different tool, RapidFlash, which did work.
Usage is pretty simple:
- Set the serial port to the correct one (on Linux, should be something like /dev/ttyUSBN, on windows, probably COMN). You should be able to remove/plug in your programmer and watch this change.
- Set the tool to the afro esc usb linker (or whatever linker you are using).
- Load the hex file via the Load Local Firmware Button.
- Click Flash Firmware.

Figure 3: RapidFlash UI
But of course, having this tool exist and be healthy would be too easy. RapidFlash is a chrome app, which is going away in the middle of this year. And it hasn't had any activity on it's github (shoulda dropped that link earlier) page for 5 years…. So while you can grab it here for now and have it easily install in chrome or chromium, that's limited.
Oddly enough, once RapidFlash has programmed it once, the ZTW spider ESC is then good to go and can be programmed with kkmulticopter. I did check the fuses and saw no difference before and after.
Workaround: Use portable chromium installs that won't update and hopefully won't break
Warning: Do not browse the internet in these ancient browser images.
I have tested both the windows portable install and the linux appimage, both give an older version of chromium that I expect won't break. I also cloned the repo in case that goes poof.
Final Approach: UsbASP programming
In the event that RapidFlash isn't working, or you won the unlottery and got an ESC with no bootloader, you can fall back to usbasp programming.
You'll need a USBasp programmer, they're pretty cheap thankfully, <10 dollars with shipping. Personally I've had success with the "HiLetgo 51" USBasp programmer on linux.
You can view the Atmega8 pinout here. Note the MOSI, MISO, RESET, SCK, and VCC/GND pins.
You can use a multimeter while the ESC is off to follow them to the pads (see image below).
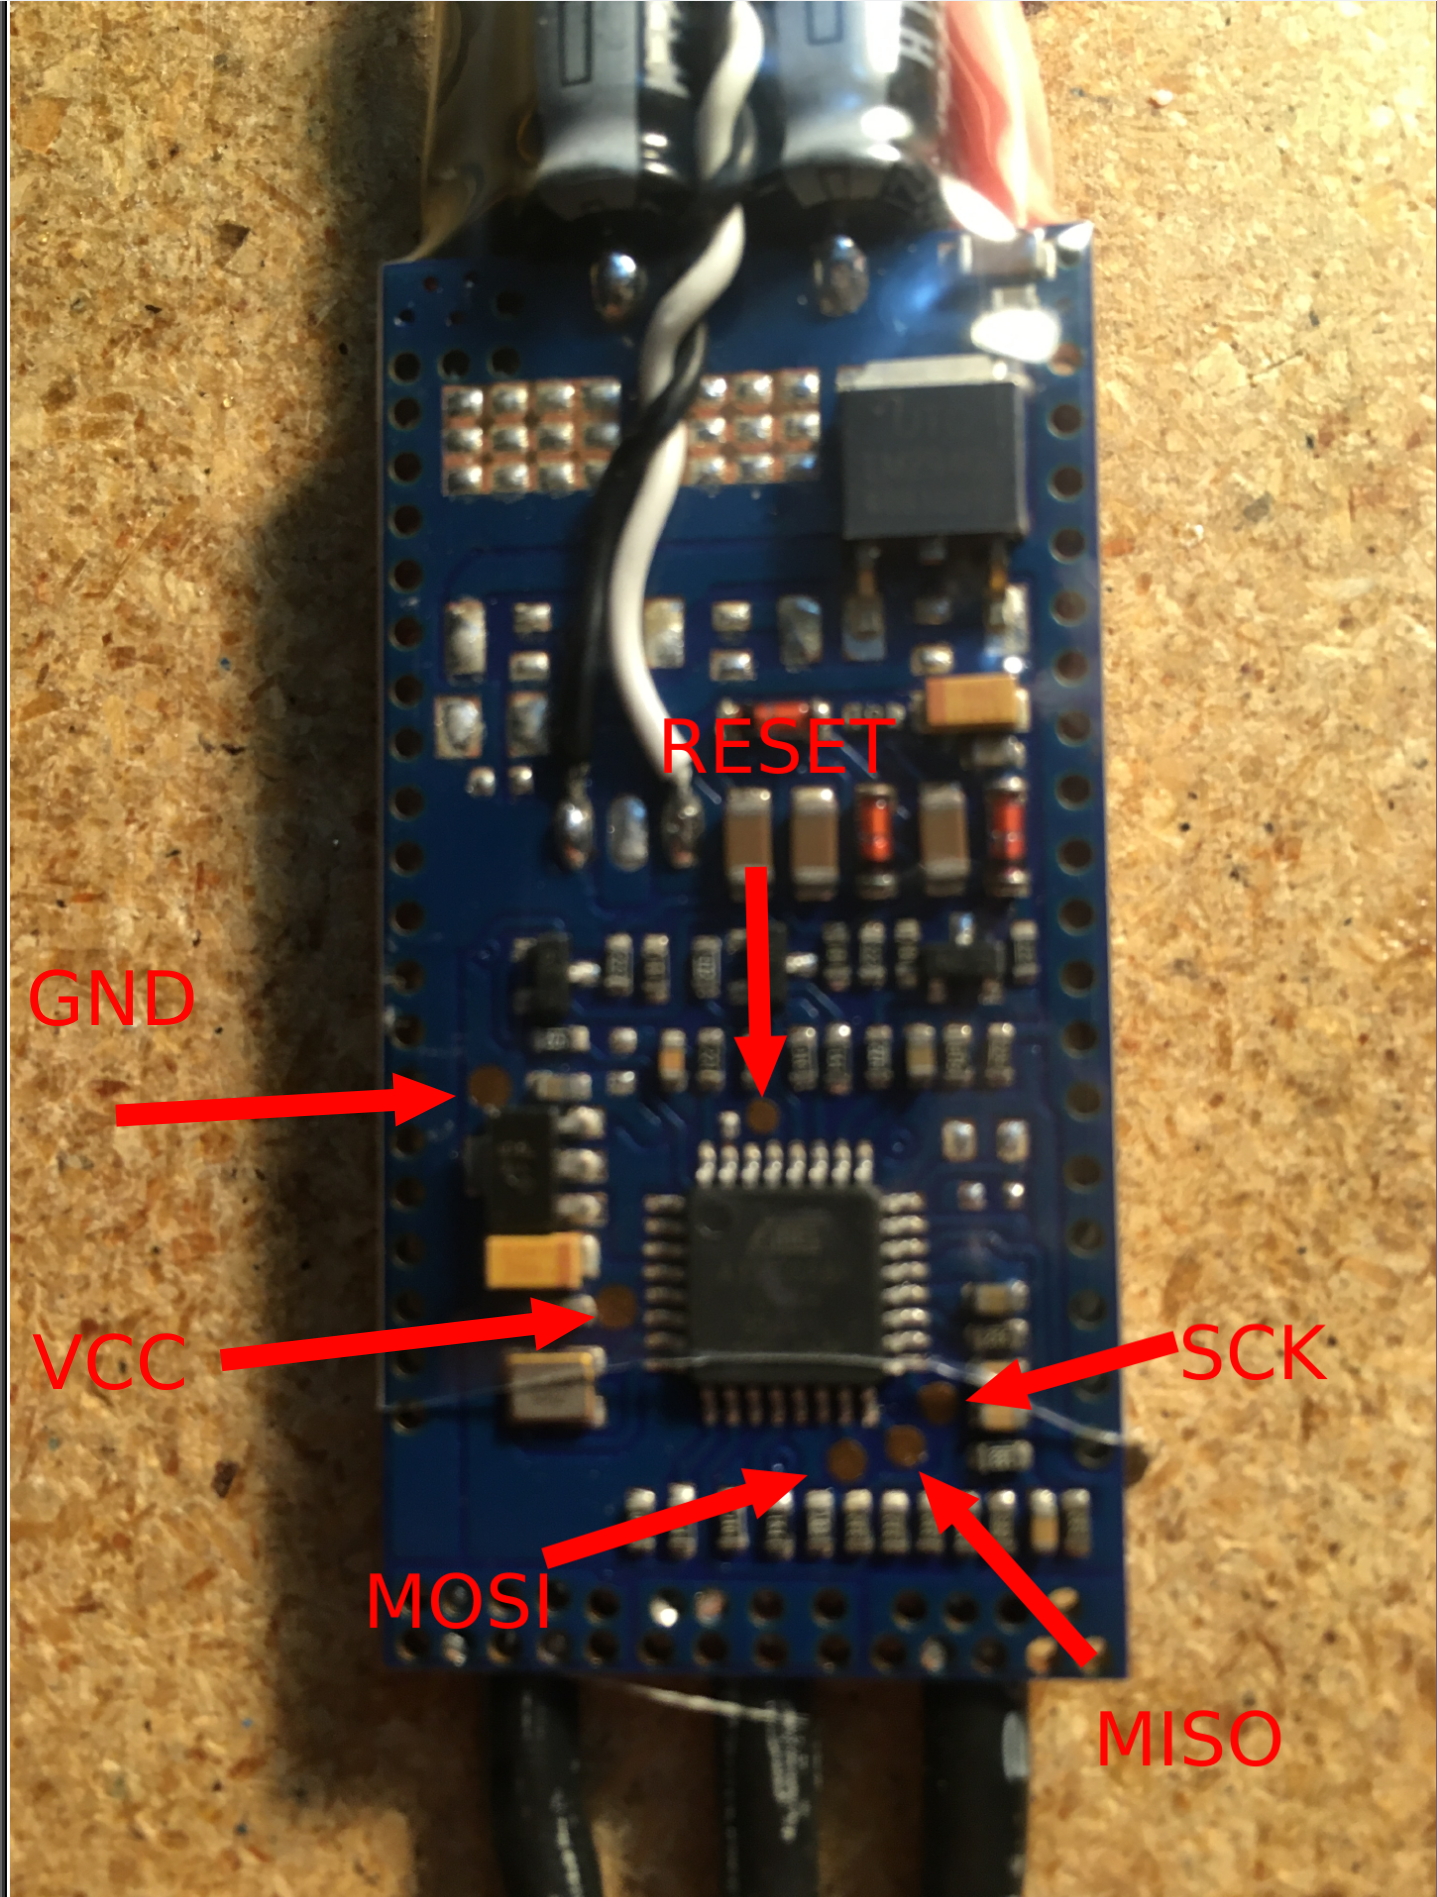
Figure 4: What the pads on the Spider ESCs look like, and the SPIDER 40A ESC mapped.

Figure 5: Note that the 30A ESC looks to be verrryy similar, I'd double check, especially the VCC/GND pads, but I imagine it's the same. I can confirm MOSI is the same at least, and I'm holding a probe to it.
Fuses should be already set, (you can use avrdude to change them/make sure anyway), so you should be able to hook this directly up to a USBAsp programmer and use kkmulticopter to flash (selecting usbasp from the dropdown).
Wiring for Flyshot and Using
Congrats, you've flashed your ESC! Now you can use Flyshot to set your speed! If however, you want speed feedback, you'll need to make one last modification.
(And if you solely want to set the speed, and don't want a tach signal, you should probably consider this version with a form of error checking, although it's not as up to date. )
You need to get the MOSI pin out and available to your blaster control board.
Thankfully, that's easy.
Figure 6: 40A Pinout again, note the MOSI.
Figure 7: 30A Pinout again, the probe is over the MOSI pad.

Figure 8: Get access to the bottom pad.

Figure 9: Carefully tin said bottom pad.

Figure 10: Carefully strip some thin wire (I used 24 AWG), tin it, and then solder that to the pad.
Now add some kind of strain relief! You don't want to rip the pad off! You'll also want to cover up the exposed PCB somehow. I ran the wire along the body of the ESC and wrapped a bit of electrical tape along the bottom to serve as both strain relief and insulation.
I braided the tach wire into the existing signal wire braid, but any form of wire management works.

Figure 11: Cut the old ESC connector, get a new 3 pin female header, and solder the gnd, signal, and tach onto it. I prefer to keep tach in the middle.
If you want to use a different ZTW Spider ESC than a 30A/40A, you'll want to double check the MOSI pin. See the USBAsp section above for directions on how to do that.
You know, I feel like I missed out on a chance to run my Spiderman themed blaster on Spider ESCs. Oh well....
Update
My newest spiderman themed blaster is now running spider ESCs.
All is right with the world.
Spider 12A ESCs
These work just fine with flyshot, bs_nfet as expected.

These would probably be pretty good for powering a small FTW style blaster, with tiny 1408 brushless motors.