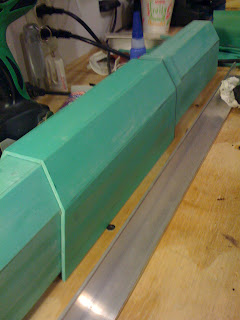
Topmost shroud layer cut.
Jump for more.
Piece of middle layer that goes between the top layer and the piece of bottom layer over the stock.
Starting to look familiar.
A bit unclear... above is 1" Schedule 40 PVC, 3/4" Schedule 40 PVC and a heat gun. This is the first step in making the flash hider.
I blasted my 3/4" PVC with the heat gun and crammed the end into the 1", swaging it down. This was to get a slightly smaller ID for a better fit to the barrel.
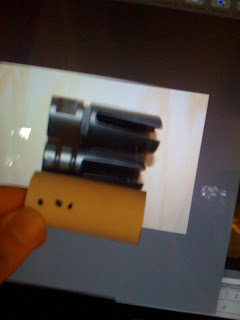
Marking the blank.
Taking marks from an image of the original, which BTW is an AAC Blackout.
Haven't added the 2 grooves on the rear but I may not ever do this. It can't really get close to the original anyway; being nerf (and a guide barrel at that), it is a much larger ID than the 5.56mm original. It looks more like a blackout for a larger caliber.
Preparing to cut the base layer.
Stock section of shroud.
You can see some strips of PVC on the sides of the shrouds. Those were tacked on with a few dots of CA and were used to shim out the lower layers of the shroud on the top surface and the sides so that the assembly could be laid flat on the bench and clamped to aluminum angles during Devcon curing. This kept everything straight in both directions.
Here is how the assembly was glued.
The straight result.
Test fitting lower shroud.
I should have this thing on the gun by tomorrow.
To do:
Fabricate the lower stock frame into the Stryfe receiver.
Devcon the barrel to the support after getting it into perfect alignment.
Make buttplate.
Add shroud mounting bosses to Stryfe receiver.
Obtain correct screws (I am going to use hex socket flatheads in black finish) to mount shrouds.
Cut vent holes in shroud, add fake charging handle to shroud.
Mount flashlight.
Reinforce the hell out of the shrouds (inside) for Built HvZ Tough certification.
Sand, possibly bondo and putty things.
Paint.
Determine an electrical course of action. I have several sets of Barricade motors and a good set of Rayven flywheels which would make this more than capable. I also have some 9 cell battery packs I could use. However, I may go Tamiya on this if my UF friend tells me his TPDs didn't explode or anything. Reliability is key.
Obtain a sling.
Make a 4 or 5 round short magazine for display and paint it black.


Hope this is not a silly question, but what are you using for the body of the gun? That blue green stuff?
ReplyDeleteI'm about to heavily modify a nerf gun to have a strong mechanical recoil and I'm wondering what is the best material to use on the outer surface that is strong to avoid getting knocked around too much
Cheers, Marty
That is PVC sheet of approximate 1/8" thickness, obtained by cutting, heating and flattening 4" (nominal) ASTM D3034 sewer pipe.
DeleteReally? That's a great idea. Thank you so much. That stuff is tough and really easy to dye to a colour that won't scratch off.
ReplyDeleteYou're very talented, love your creations!